Use our AFL UTM Tracker plugin to capture and populate dynamic UTM parameters for your legacy HubSpot Forms embedded into your WordPress site.
You will be utilizing our Javascript Merge Tag feature to populate the UTM parameters into your HubSpot form hidden fields which will be then be saved into the HubSpot Contact property.
Minimum Requirements
- AFL UTM Tracker v2.23.3
- Hubspot Form v2 (legacy)
- WordPress v5.0.0
Changelog
- 2025-08-06
- Updated Appfromlab HTML Code to support optout value.
- 2025-08-05
- Update steps to use Contact Property Internal Name with “afl_” prefix so that it doesn’t conflict with HubSpot own tracking script.
- Updated Default value.
- Added steps for First Touch UTM parameters.
- 2025-08-04
- Introduce our new HubSpot v2 Javascript file (hubspot-v2.min.js) instead of custom code snippet.
Steps
Let’s summarize the steps to populate the UTM parameter into your HubSpot Form v2.
- Enable the “Javascript Merge Tag” feature under the AFL UTM Tracker plugin settings.
- In your HubSpot settings, create Contact Properties for the UTM parameters.
- In your HubSpot settings, display the UTM parameters as Contact Card.
- In your HubSpot Form, add the UTM parameter properties as Hidden Fields.
- Get your HubSpot Form Embed Code.
- Get our Appfromlab HTML Code.
- Paste our Appfromlab HTML Code into your WordPress page.
- Test your HubSpot form.
- View your HubSpot form submission.
1. Enable the Javascript Merge Tag feature
- Login to your WordPress Admin dashboard.
- Go to AFL UTM Tracker > Settings page.
- Under Attribution section, enable the Javascript Merge Tag feature.
- Save settings.
- Clear all page cache from your caching plugin.
2. HubSpot: Create Contact Properties for UTM parameters
Here you will be creating contact properties so that UTM parameters can be saved into a Contact.
- Login to your HubSpot account > Settings page.
- Data Management > Objects > Contacts.
- Setup > Properties > Manage Contact properties.
- Group tab > Create Group.
- Name: AFL UTM Tracker
NOTE: For the Internal Name below, we will use our prefix "afl_" so that it does not conflict with HubSpot properties and HubSpot own UTM tracking script.Create Properties for Last Touch UTM Parameters
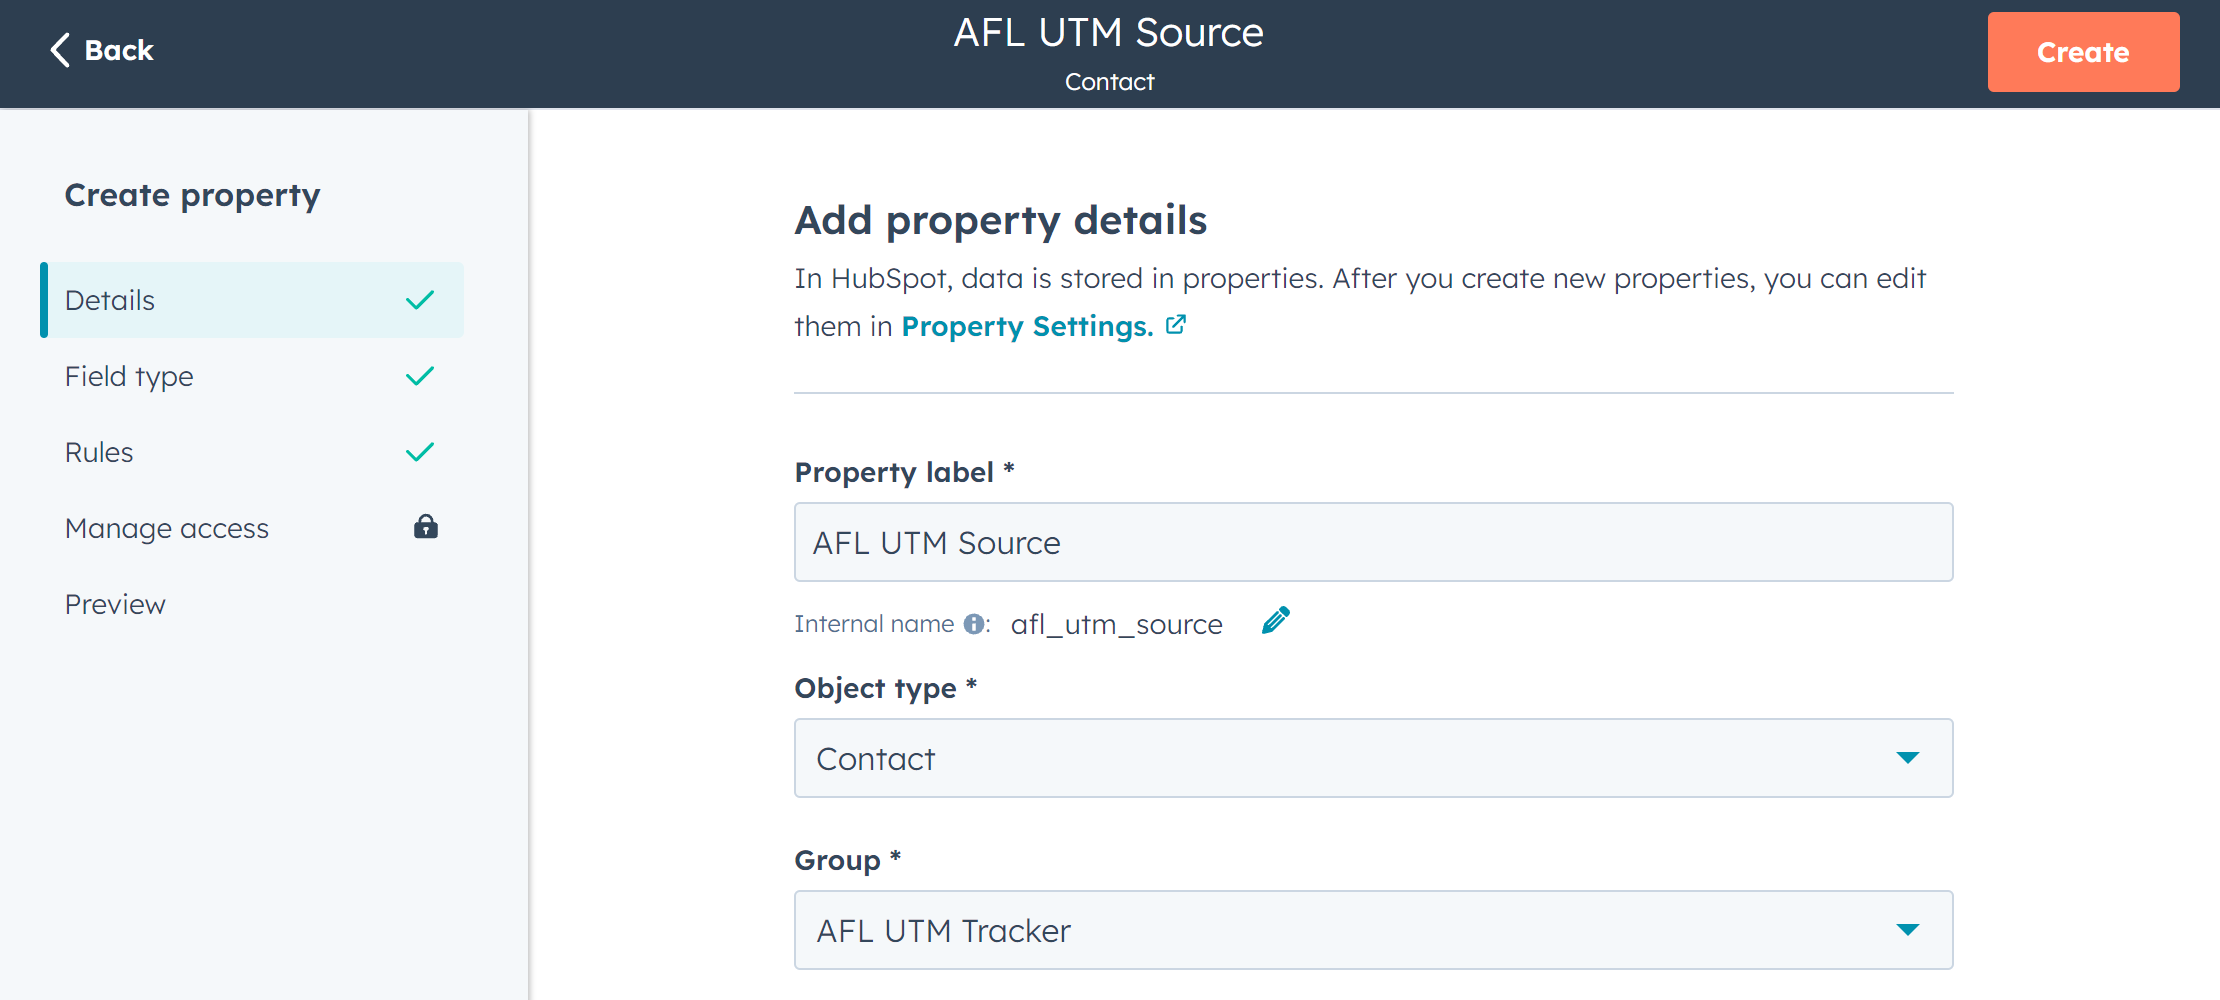
- Properties tab > Create property.
- Property label: AFL UTM Source
- Internal name: afl_utm_source
- Object type: Contact
- Group: AFL UTM Tracker
- Field type: Single-line text
- Save.
- Properties tab > Create property.
- Property label: AFL UTM Medium
- Internal name: afl_utm_medium
- Object type: Contact
- Group: AFL UTM Tracker
- Field type: Single-line text
- Save.
- Properties tab > Create property.
- Property label: AFL UTM Campaign
- Internal name: afl_utm_campaign
- Object type: Contact
- Group: AFL UTM Tracker
- Field type: Single-line text
- Save.
Create Properties for First Touch UTM Parameters
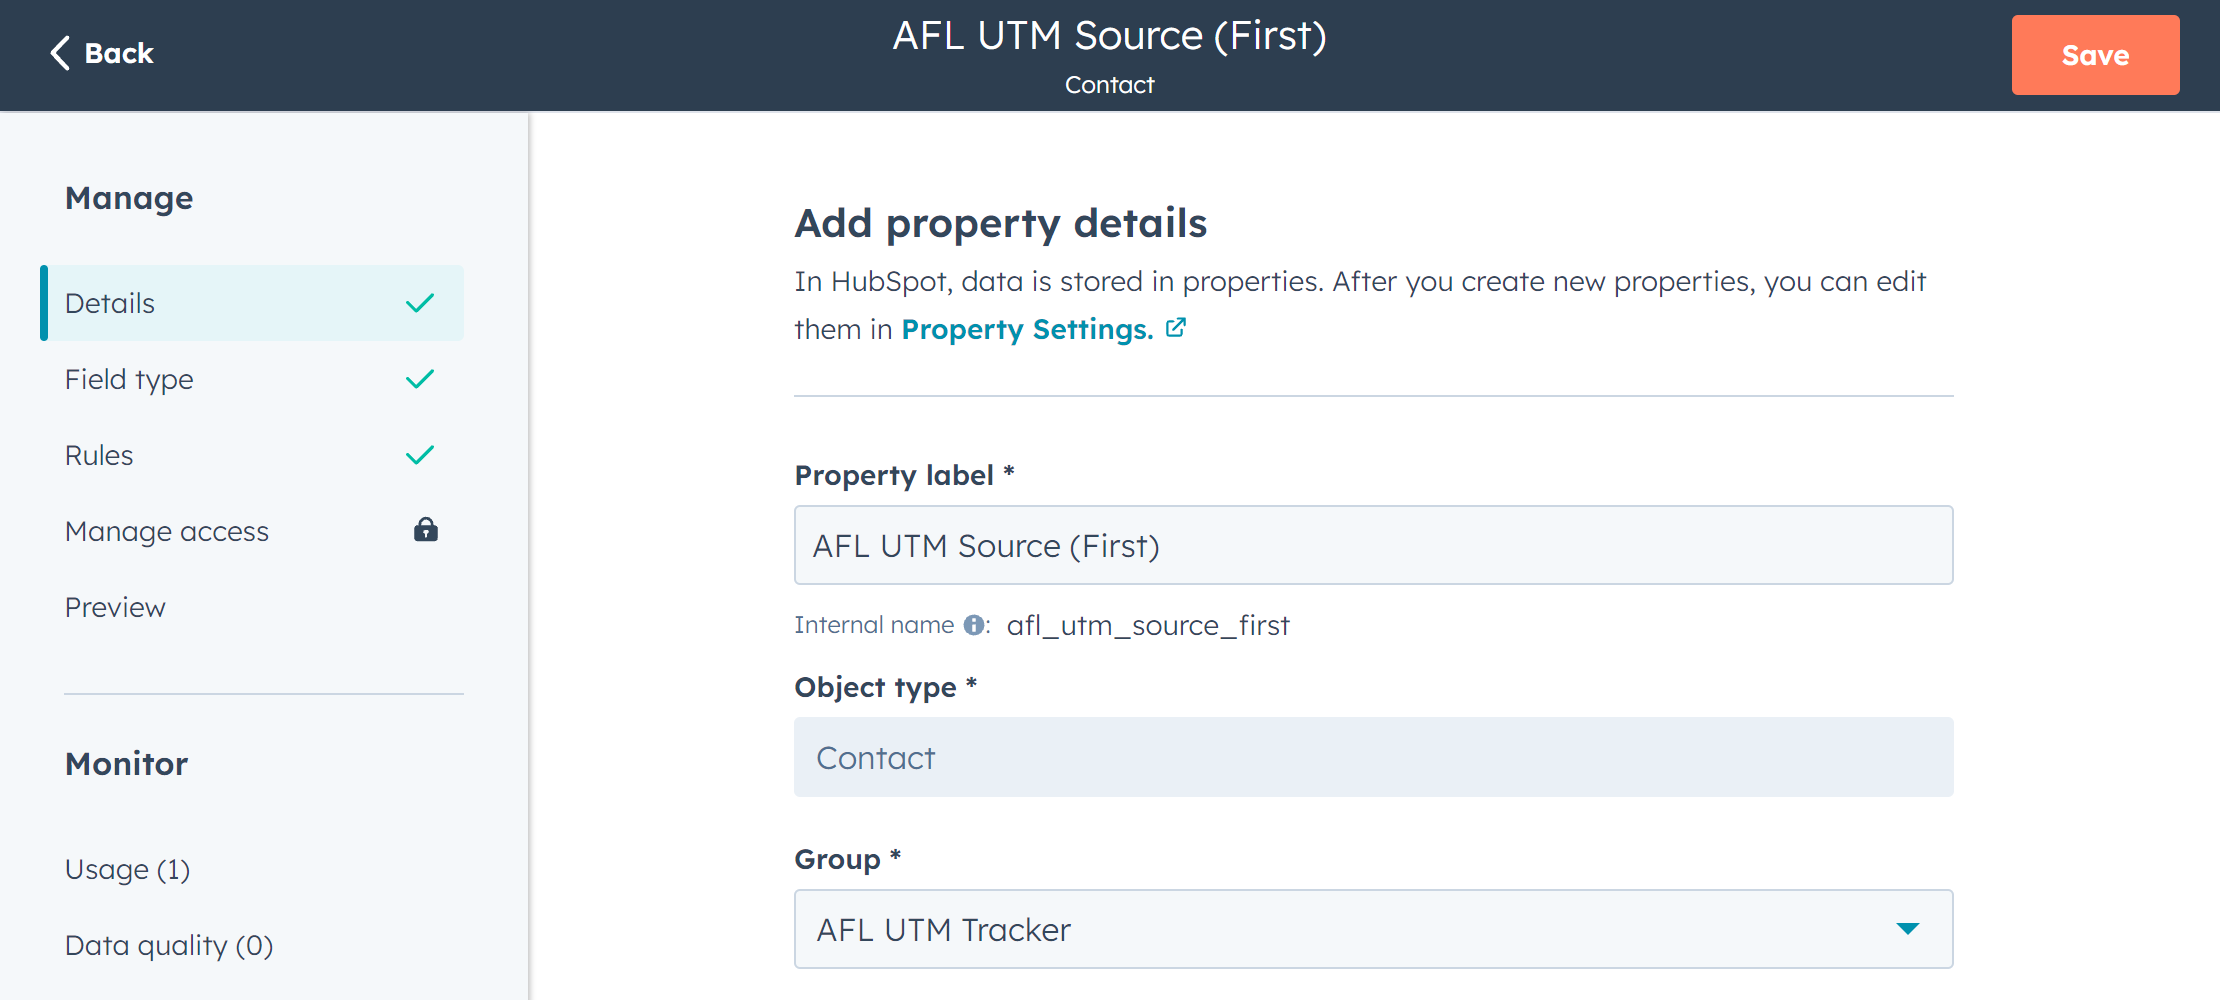
- Properties tab > Create property.
- Property label: AFL UTM Source (First)
- Internal name: afl_utm_source_first
- Object type: Contact
- Group: AFL UTM Tracker
- Field type: Single-line text
- Save.
- Properties tab > Create property.
- Property label: AFL UTM Medium (First)
- Internal name: afl_utm_medium_first
- Object type: Contact
- Group: AFL UTM Tracker
- Field type: Single-line text
- Save.
- Properties tab > Create property.
- Property label: AFL UTM Campaign (First)
- Internal name: afl_utm_campaign_first
- Object type: Contact
- Group: AFL UTM Tracker
- Field type: Single-line text
- Save.
Want to populate more attribution data?
Refer to our Javascript Merge Tag list to populate First Touch UTM parameters, Last Touch UTM parameters, click identifiers (gclid, fbclid, msclkid) and other attribution data into your HubSpot Form.
3. HubSpot: Create Contact Card to display UTM parameters
Here is how you can display the UTM parameters in an individual Contact view.
- Go to your HubSpot > Settings page.
- Data Management > Objects > Contacts.
- Record Customization tab > Default view.
Create Card for Last Touch UTM parameters
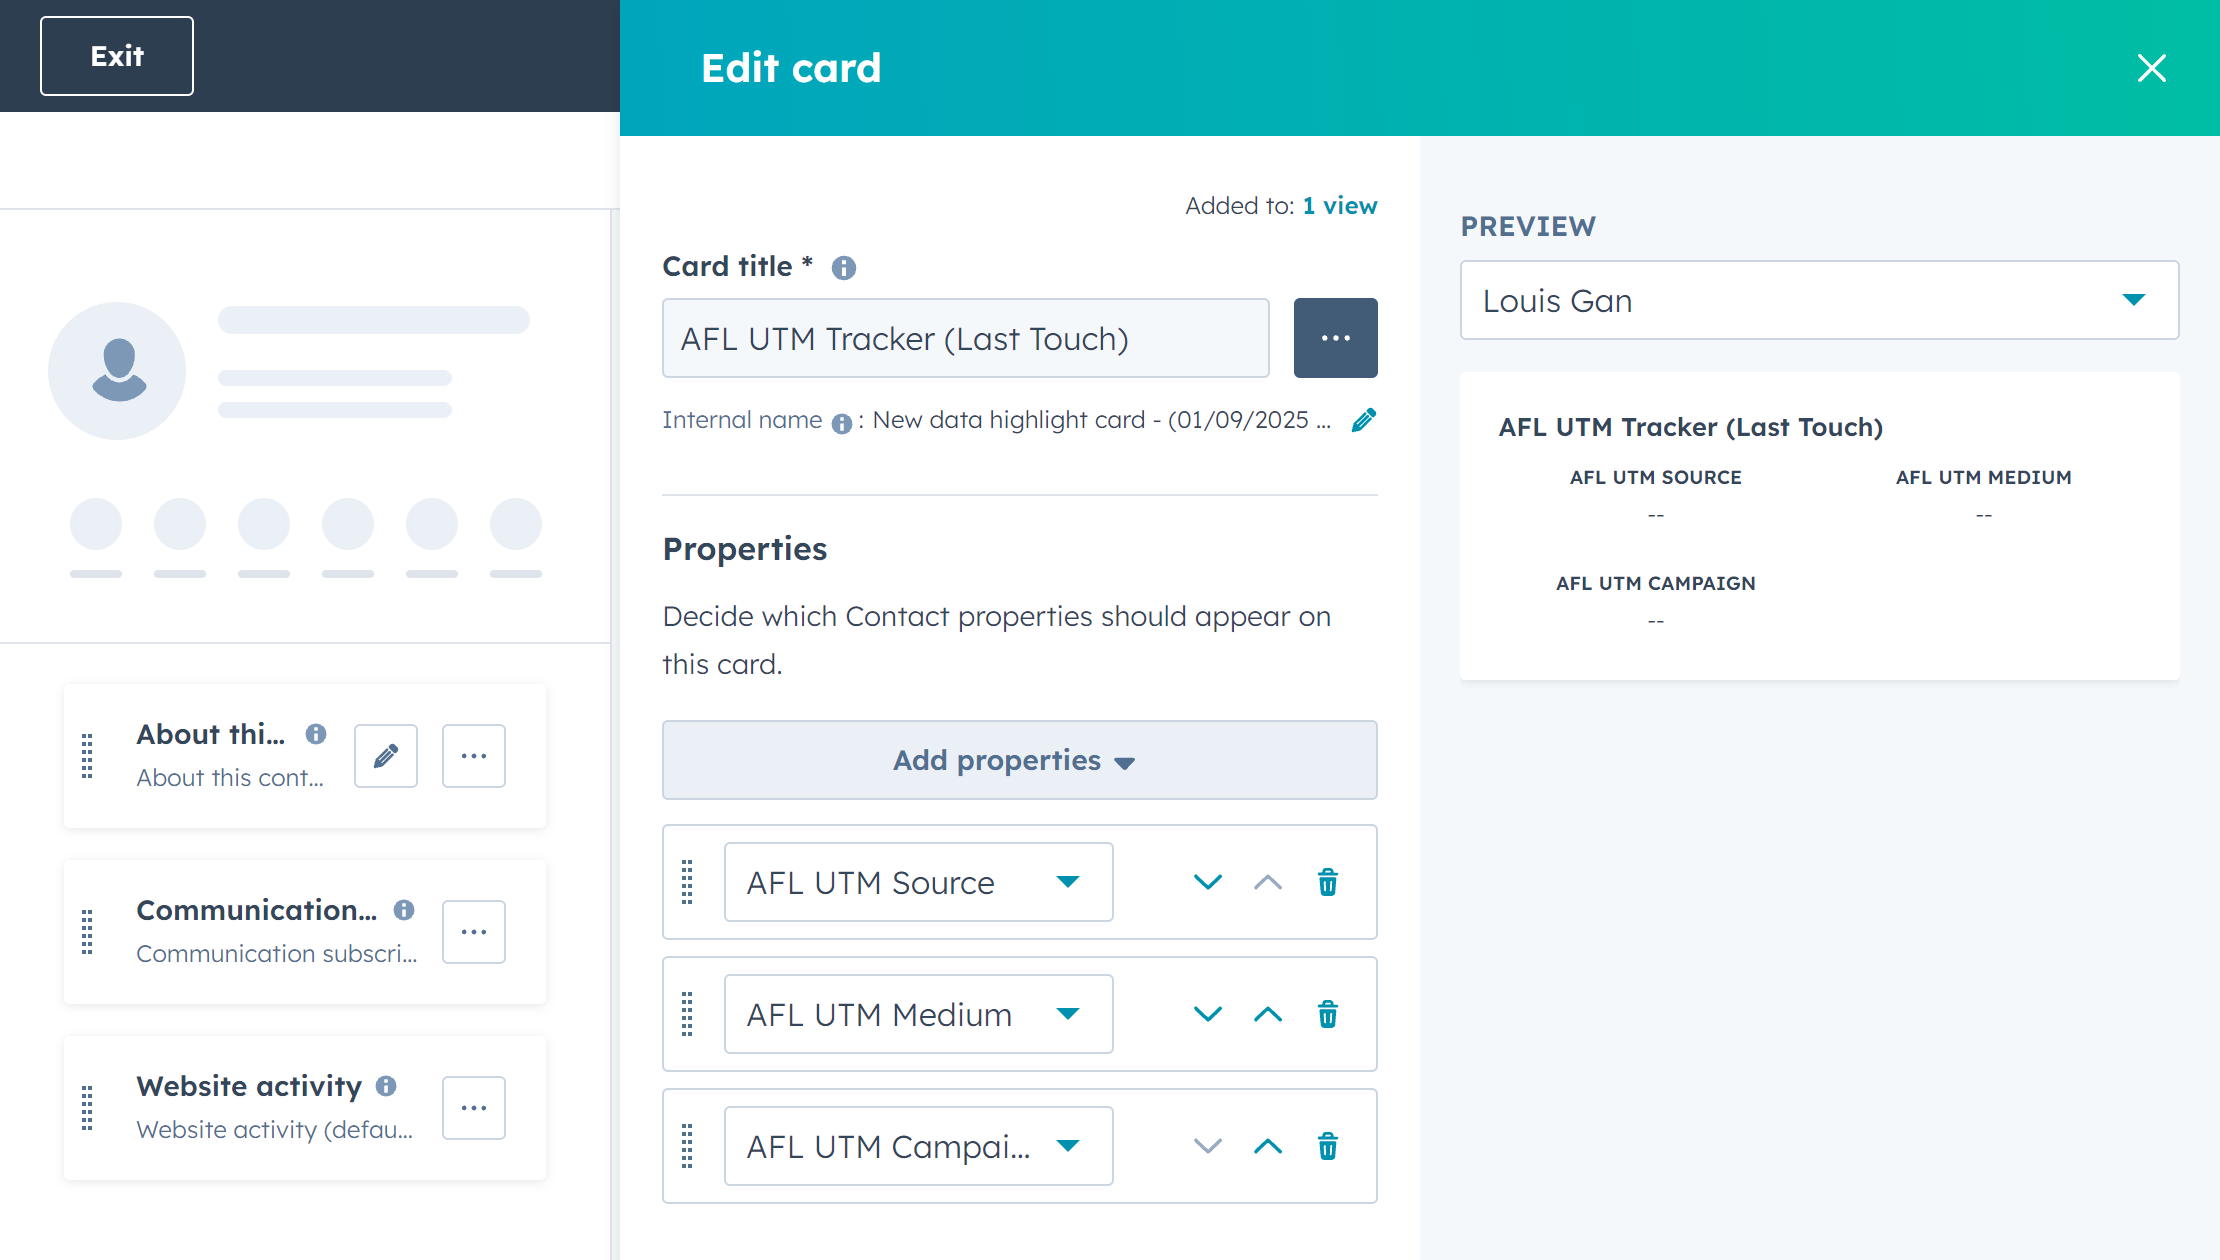
- Add cards > Create card > Data highlight.
- Cart title: AFL UTM Tracker (Last Touch)
- Properties > Add properties.
- Select the AFL UTM Source property.
- Select the AFL UTM Medium property.
- Select the AFL UTM Campaign property.
- Save.
Create Card for First Touch UTM parameters
- Add cards > Create card > Data highlight.
- Cart title: AFL UTM Tracker (First Touch)
- Properties > Add properties.
- Select the AFL UTM Source (First) property.
- Select the AFL UTM Medium (First) property.
- Select the AFL UTM Campaign (First) property.
- Save.
- Save and exit.
4. HubSpot: Add Hidden Fields to your form
Here you will be adding the Contact Properties which you have just created into your form.
- Go to Hubspot > Marketing > Forms.
- Select your form.
You will be using our Javascript Merge Tag formula in the hidden field default value property.
Hidden Fields for Last Touch UTM parameters
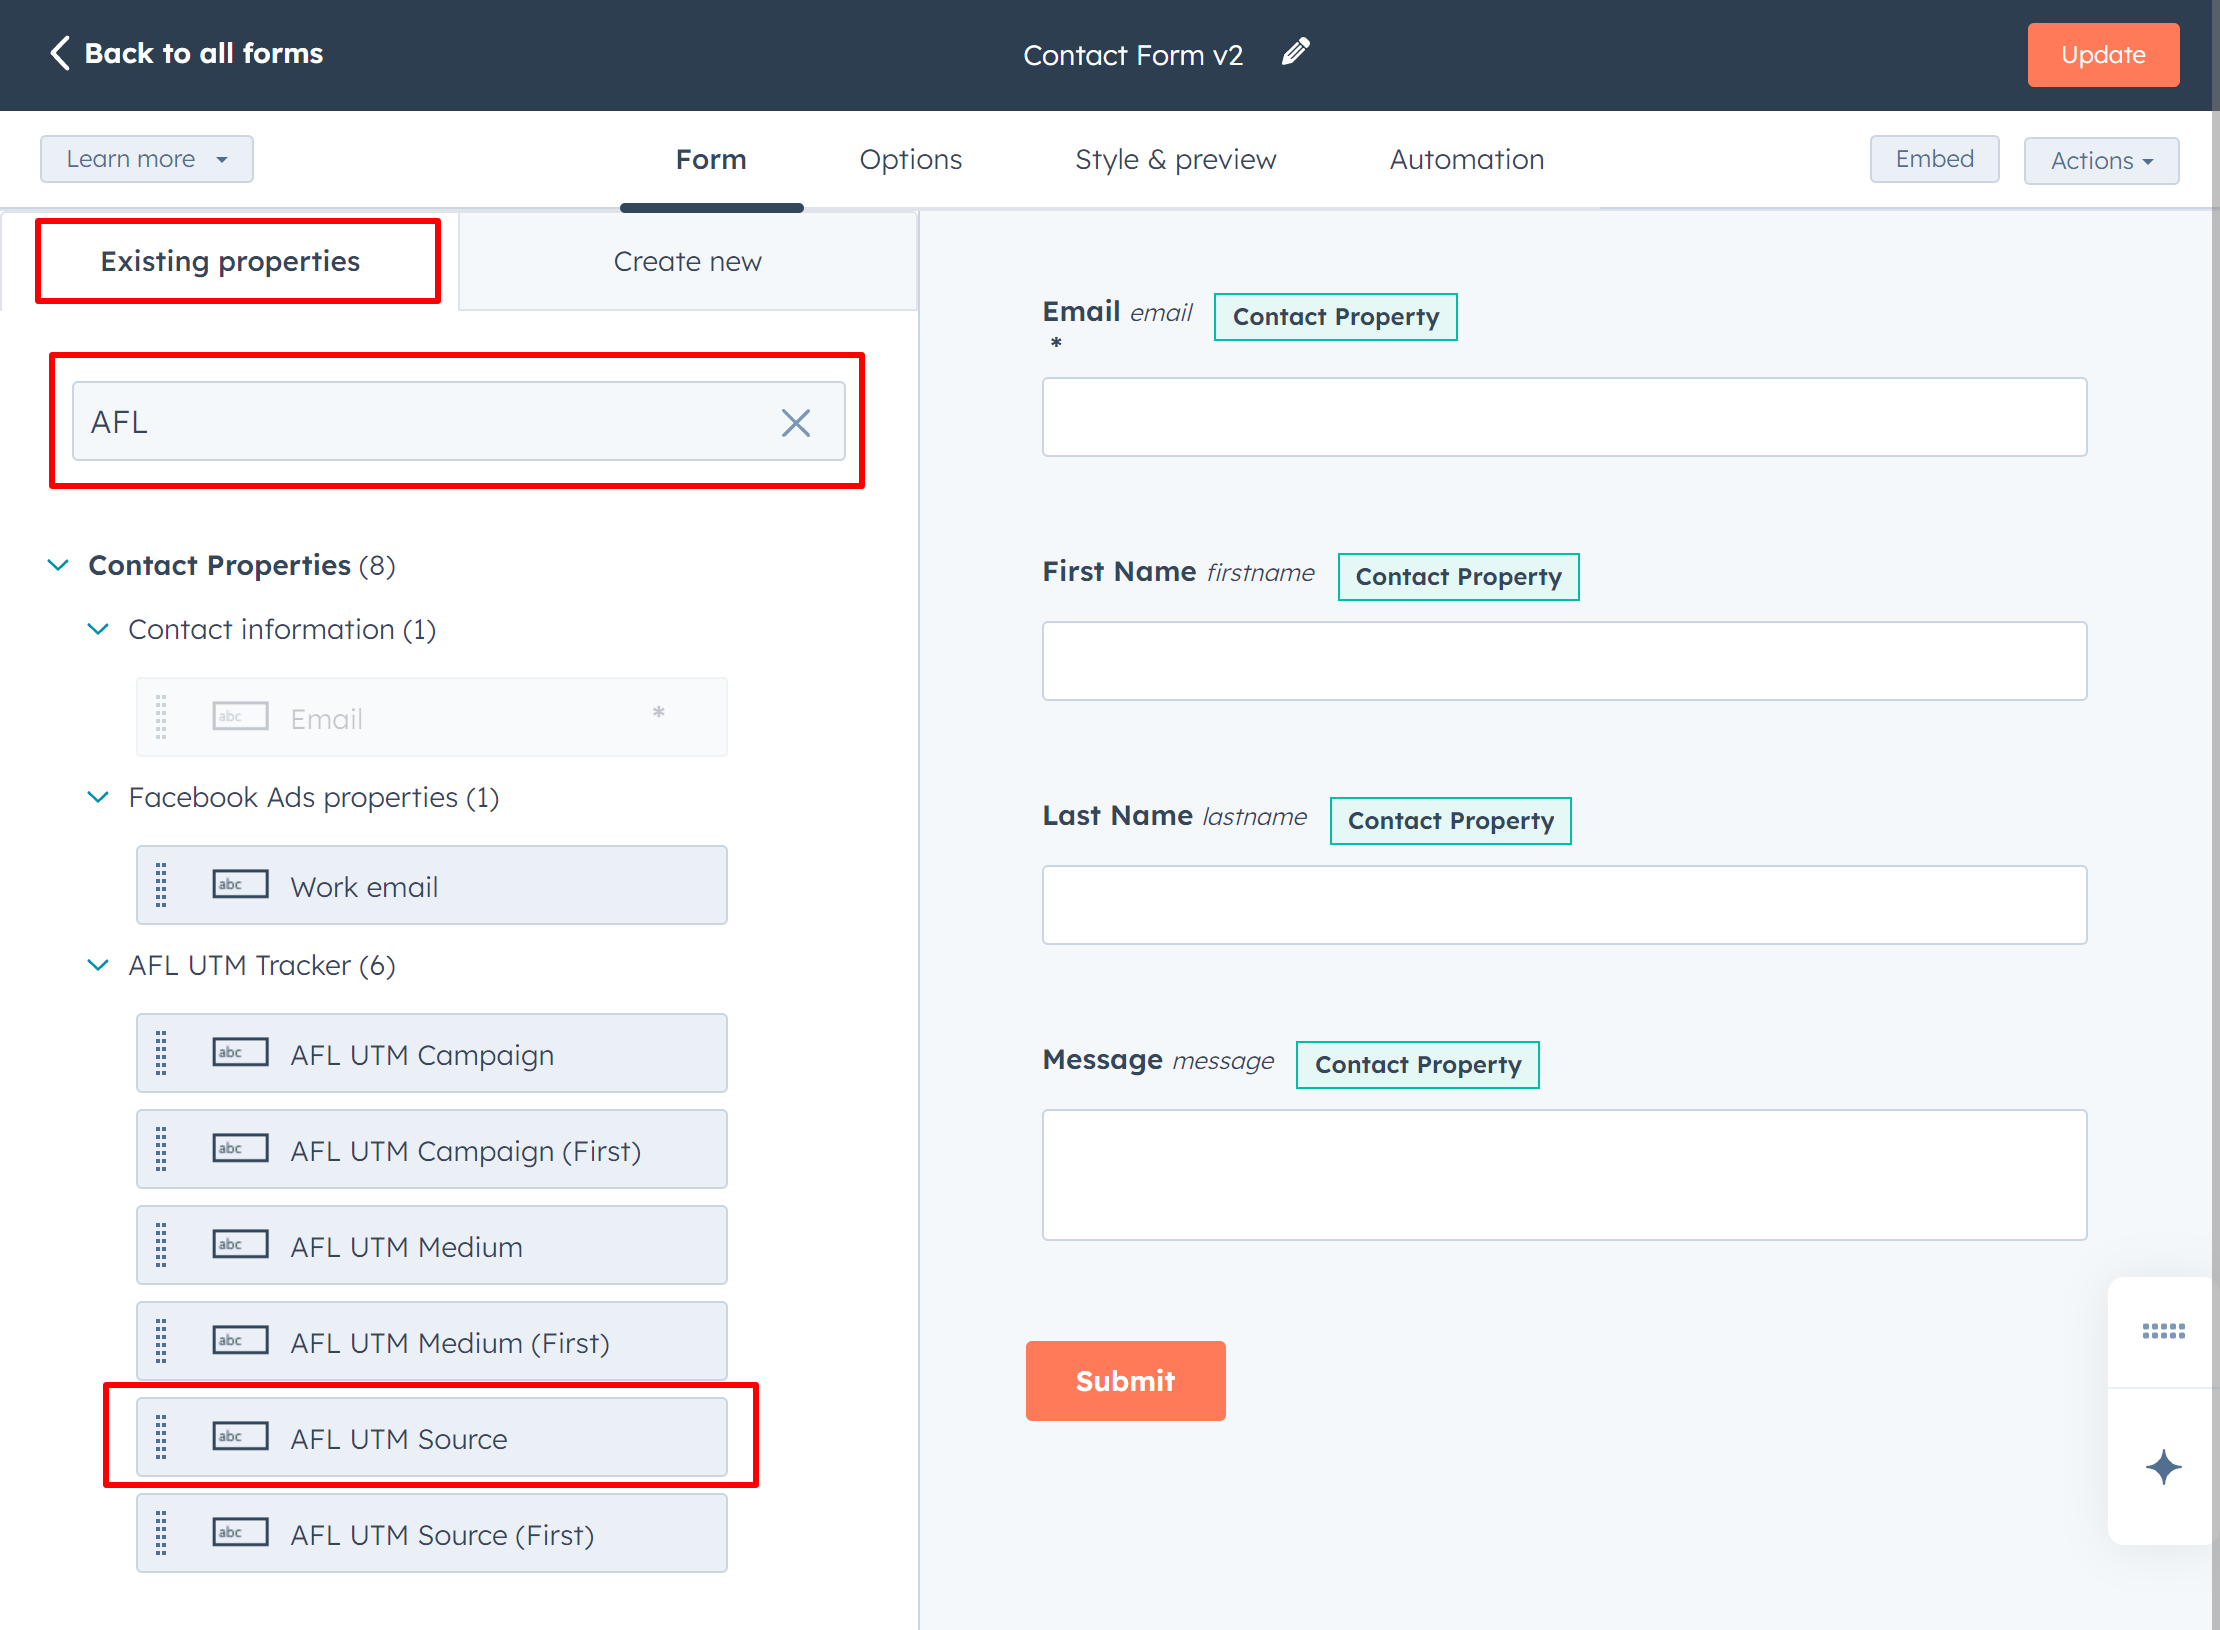
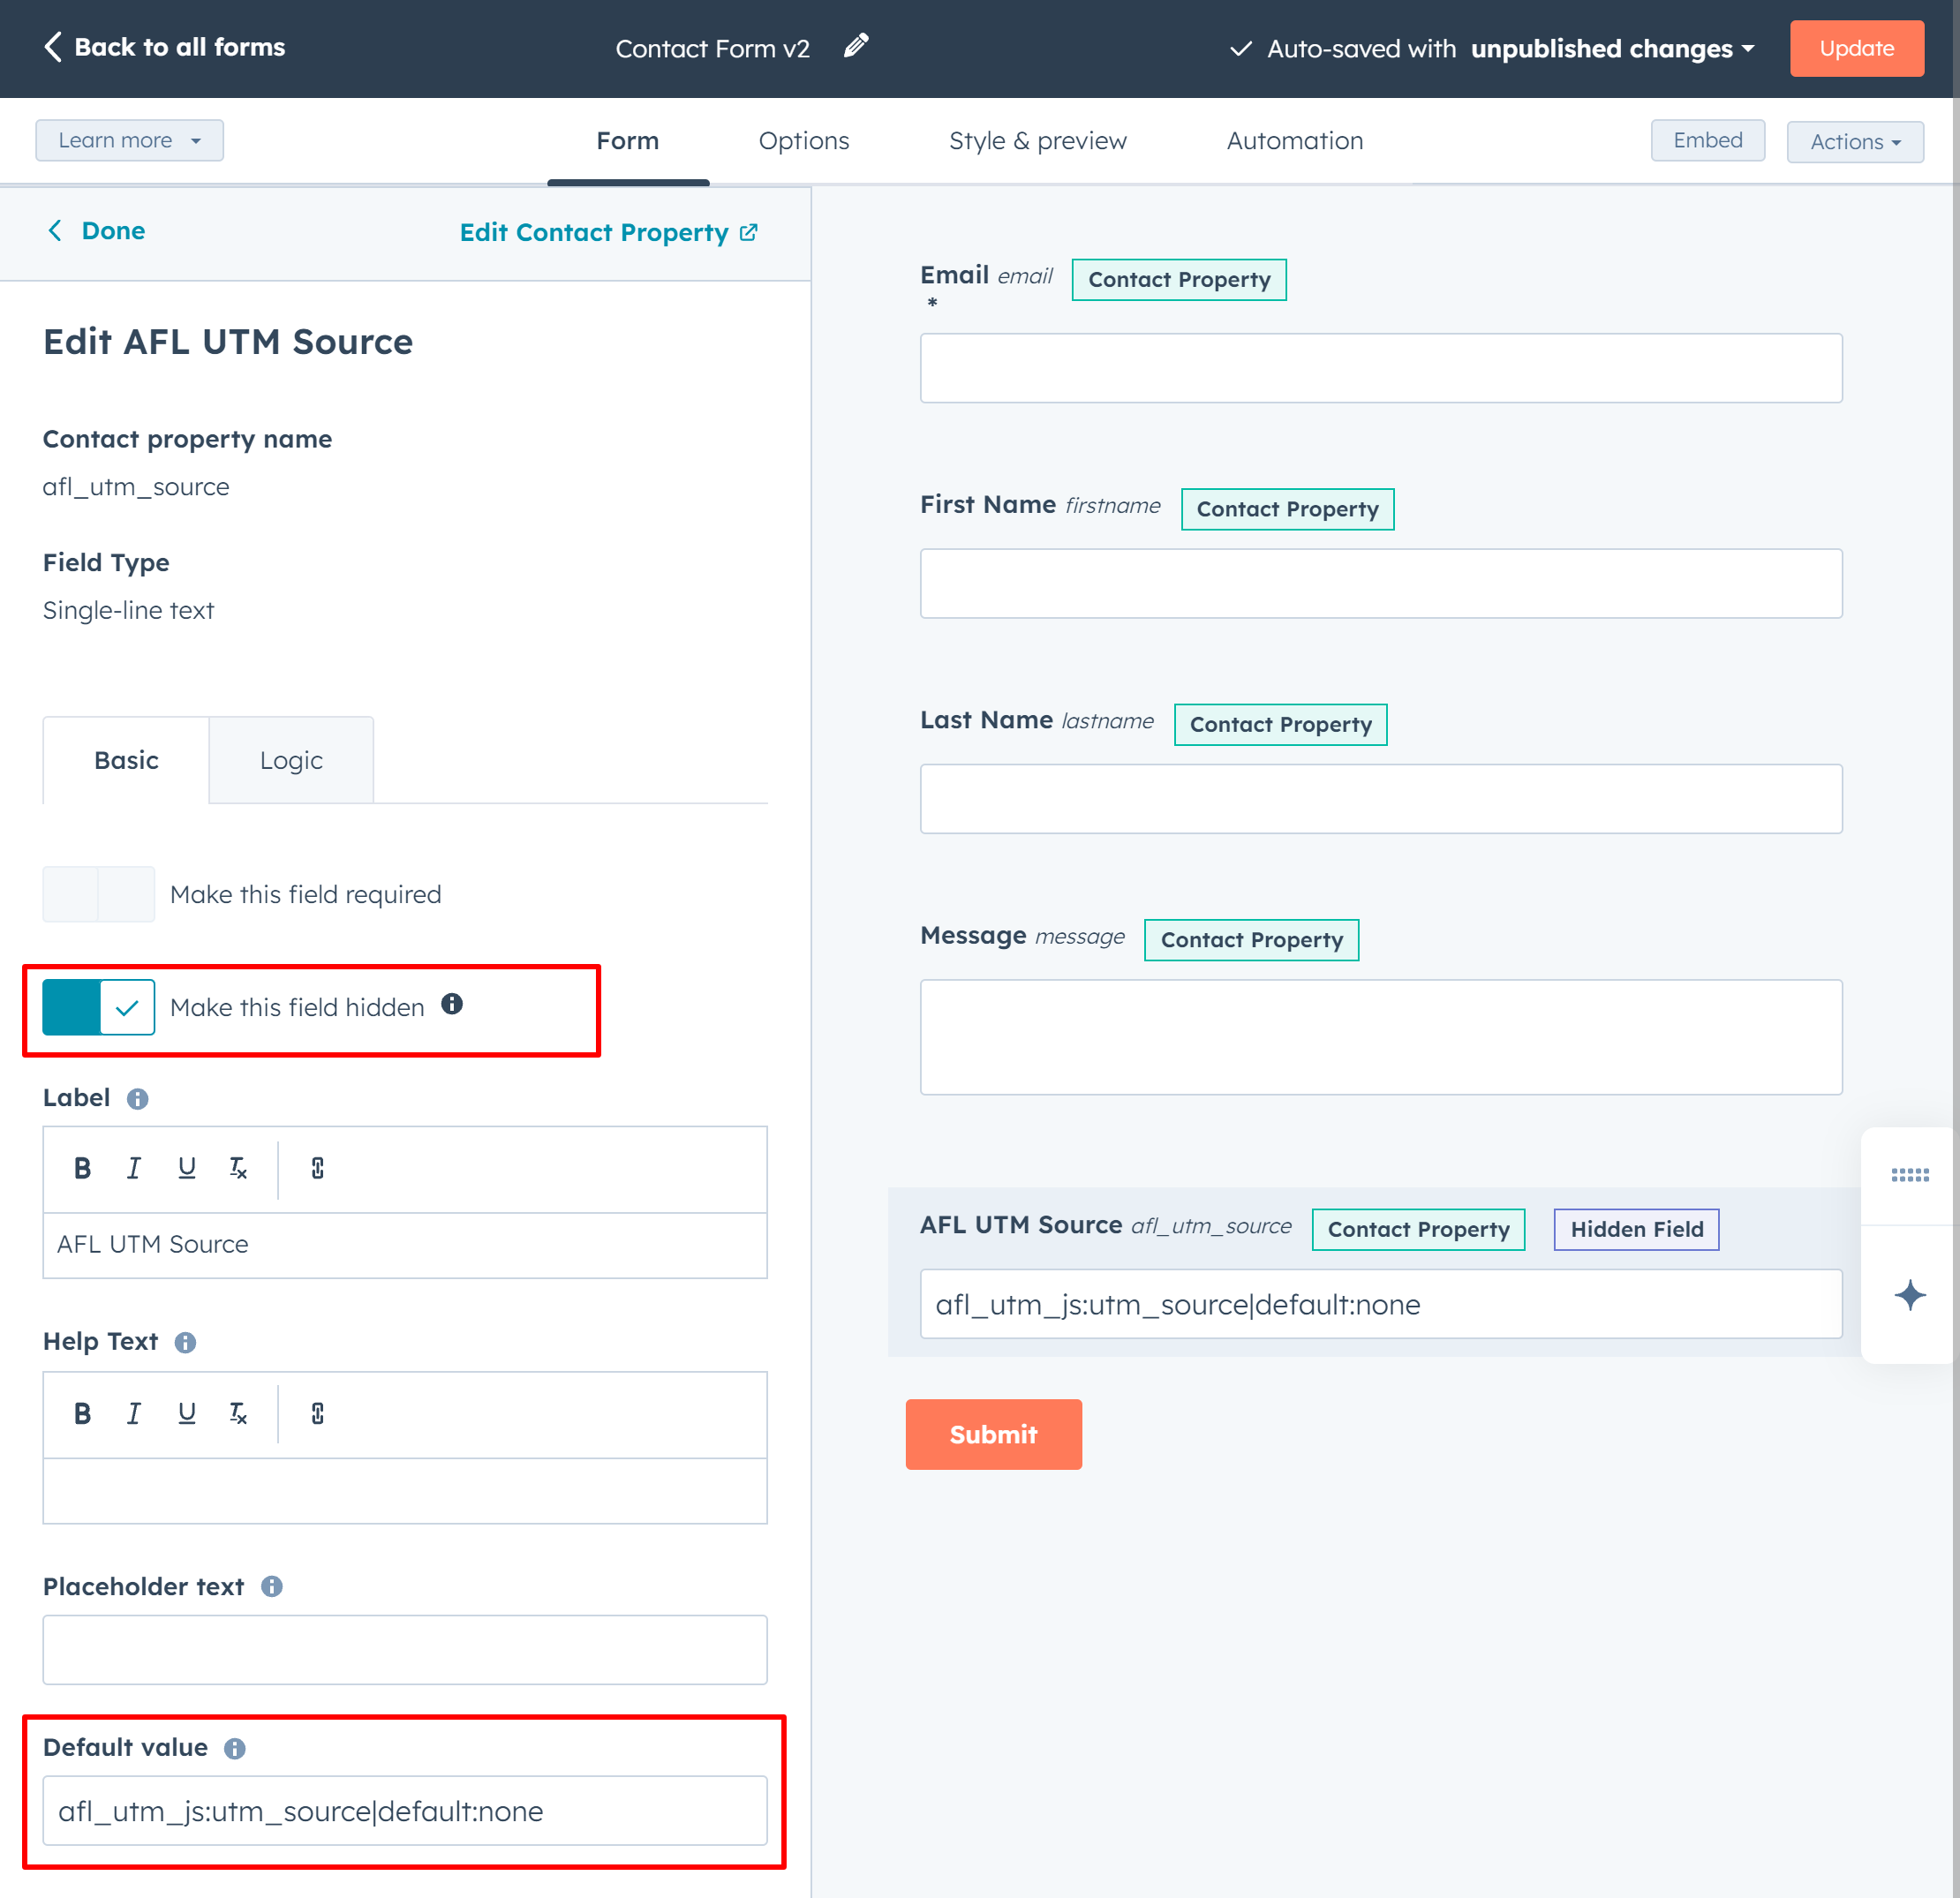
- Existing properties > Search > AFL UTM Source.
- Make this field hidden: Enable
- Default value: afl_utm_js:utm_source|default:none
- Existing properties > Search > AFL UTM Medium.
- Make this field hidden: Enable
- Default value: afl_utm_js:utm_medium|default:none
- Existing properties > Search > AFL UTM Campaign.
- Make this field hidden: Enable
- Default value: afl_utm_js:utm_campaign|default:none
Hidden Fields for First Touch UTM parameters
- Existing properties > Search > AFL UTM Source (First).
- Make this field hidden: Enable
- Default value: afl_utm_js:utm_source_1st|default:none
- Existing properties > Search > AFL UTM Medium (First).
- Make this field hidden: Enable
- Default value: afl_utm_js:utm_medium_1st|default:none
- Existing properties > Search > AFL UTM Campaign (First)
- Make this field hidden: Enable
- Default value: afl_utm_js:utm_campaign_1st|default:none
Review and update form and published changes.
5. Get your HubSpot Form Embed Code
- Go to your HubSpot > Marketing > Forms.
- Select the form > Edit Form.
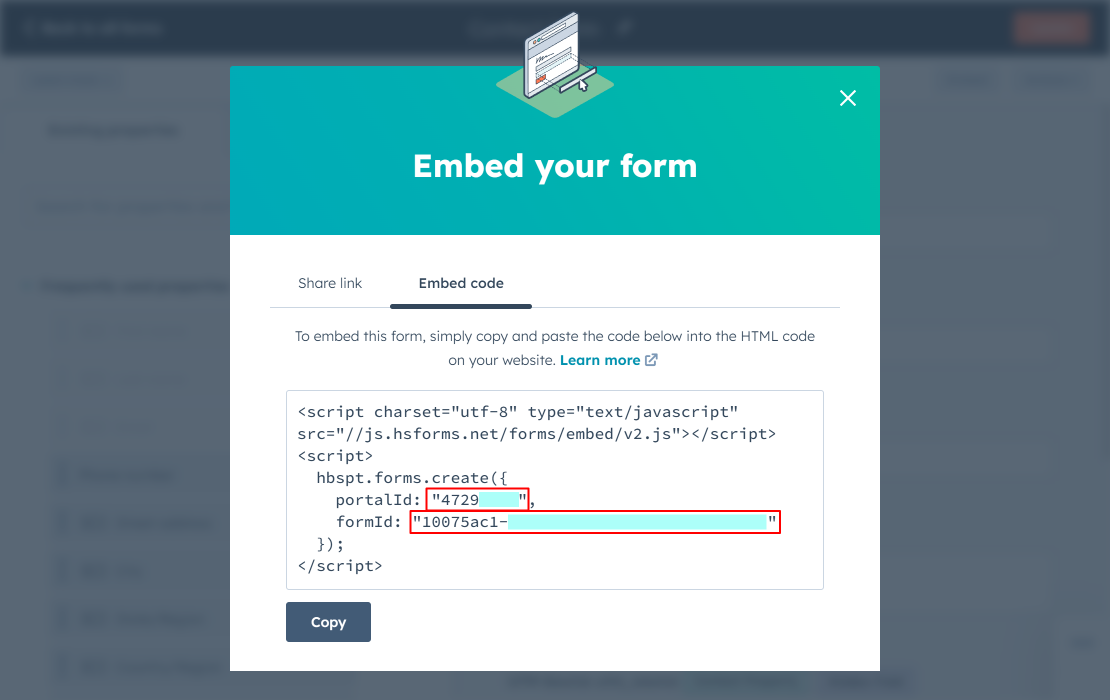
- Click on the Embed button on the top.
- Select the Embed code tab.
- Copy your portalId and formId value (we will be using these values in the next section).
6. Get our Appfromlab HTML Code
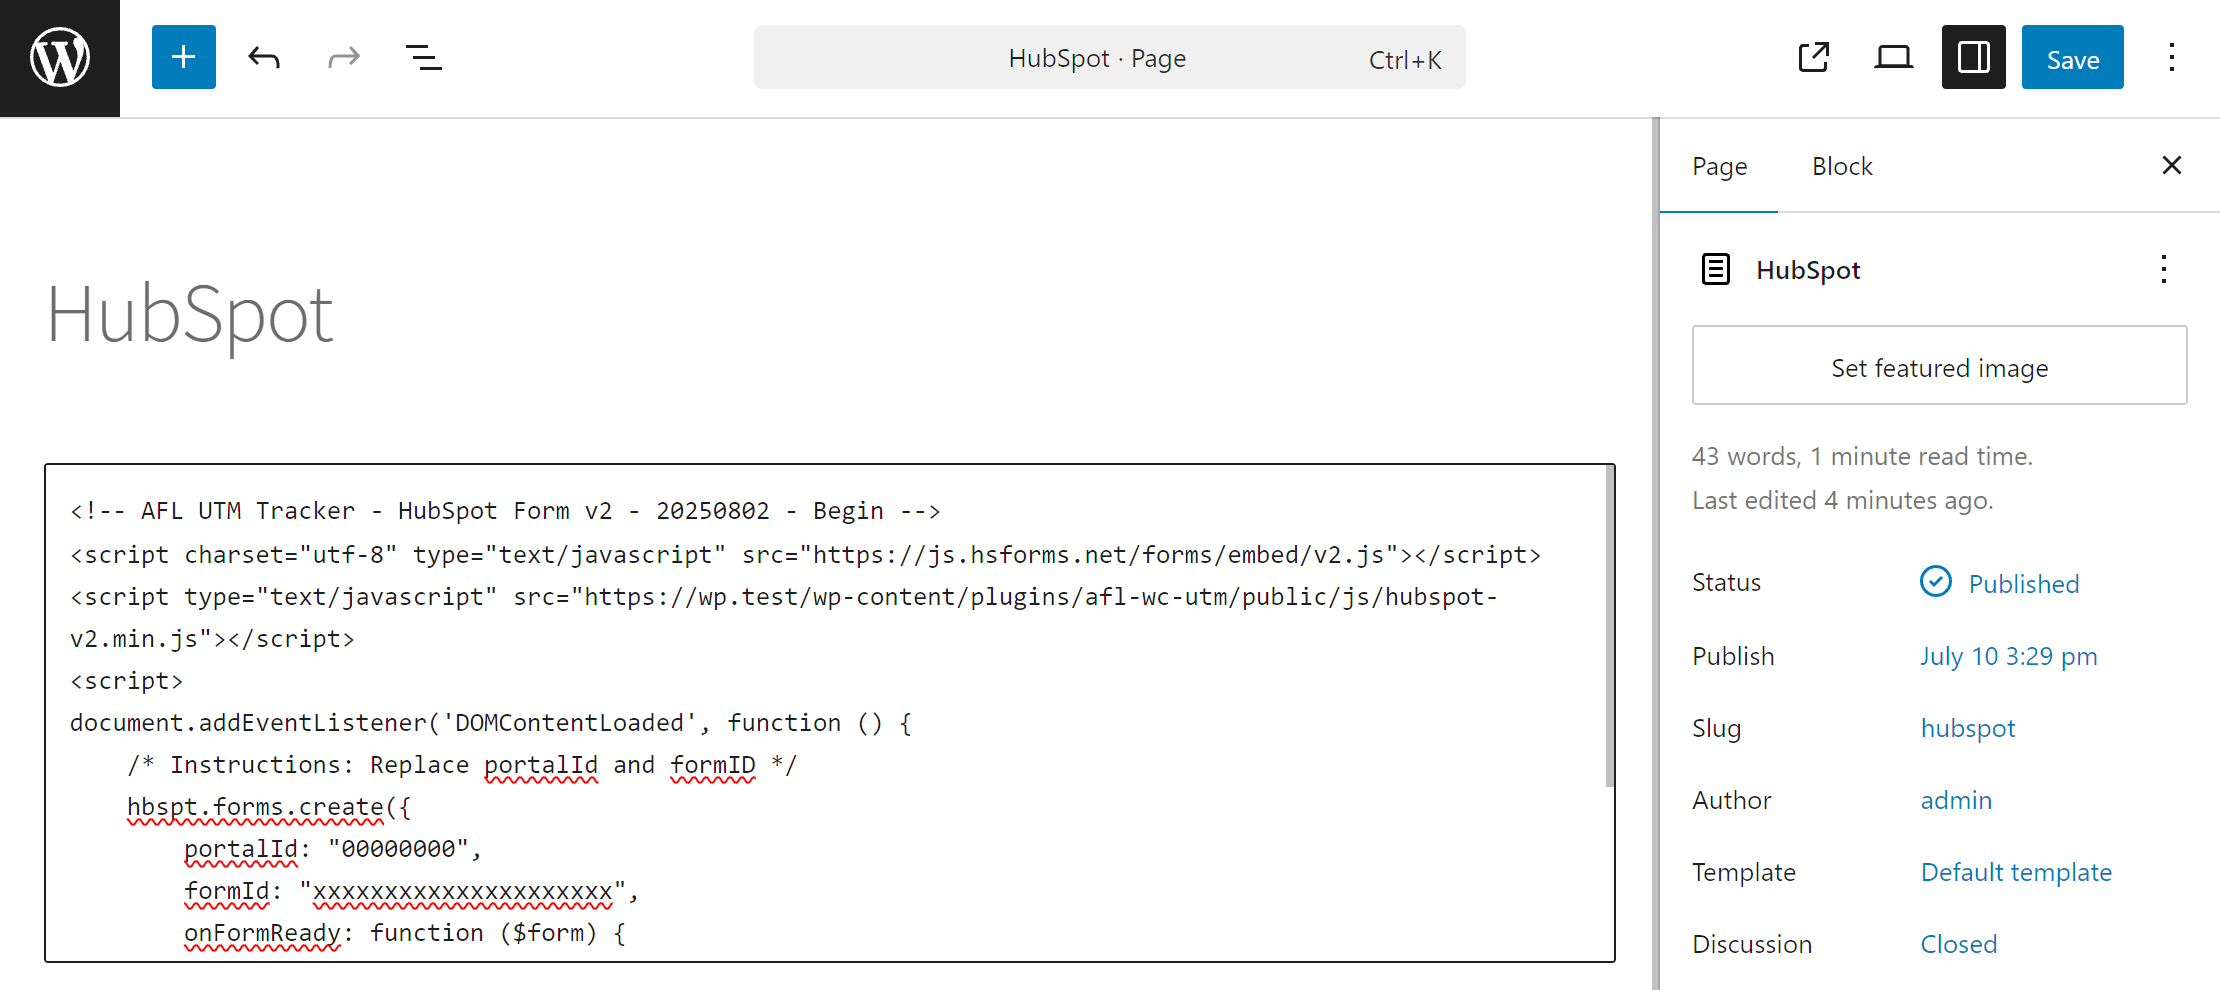
You will need to change the values in the Javascript code.
- On Line 4, replace MY_DOMAIN_NAME with your website URL.
- On Line 9, replace the portalId property value with your value.
- On Line 10, replace the formId property value with your value.
7. Paste our Appfromlab HTML Code into your WordPress Page
- Login to your WordPress admin dashboard.
- Add a “Custom HTML” block into your WordPress page.
- Paste our Appfromlab HTML Code into the block.
- Save page and clear page cache.
- Test your HubSpot form.
8. Test your HubSpot Form
- Generate a UTM URL to your website.
- Visit your UTM URL in private-browsing mode to simulate a new visitor.
- Submit form.
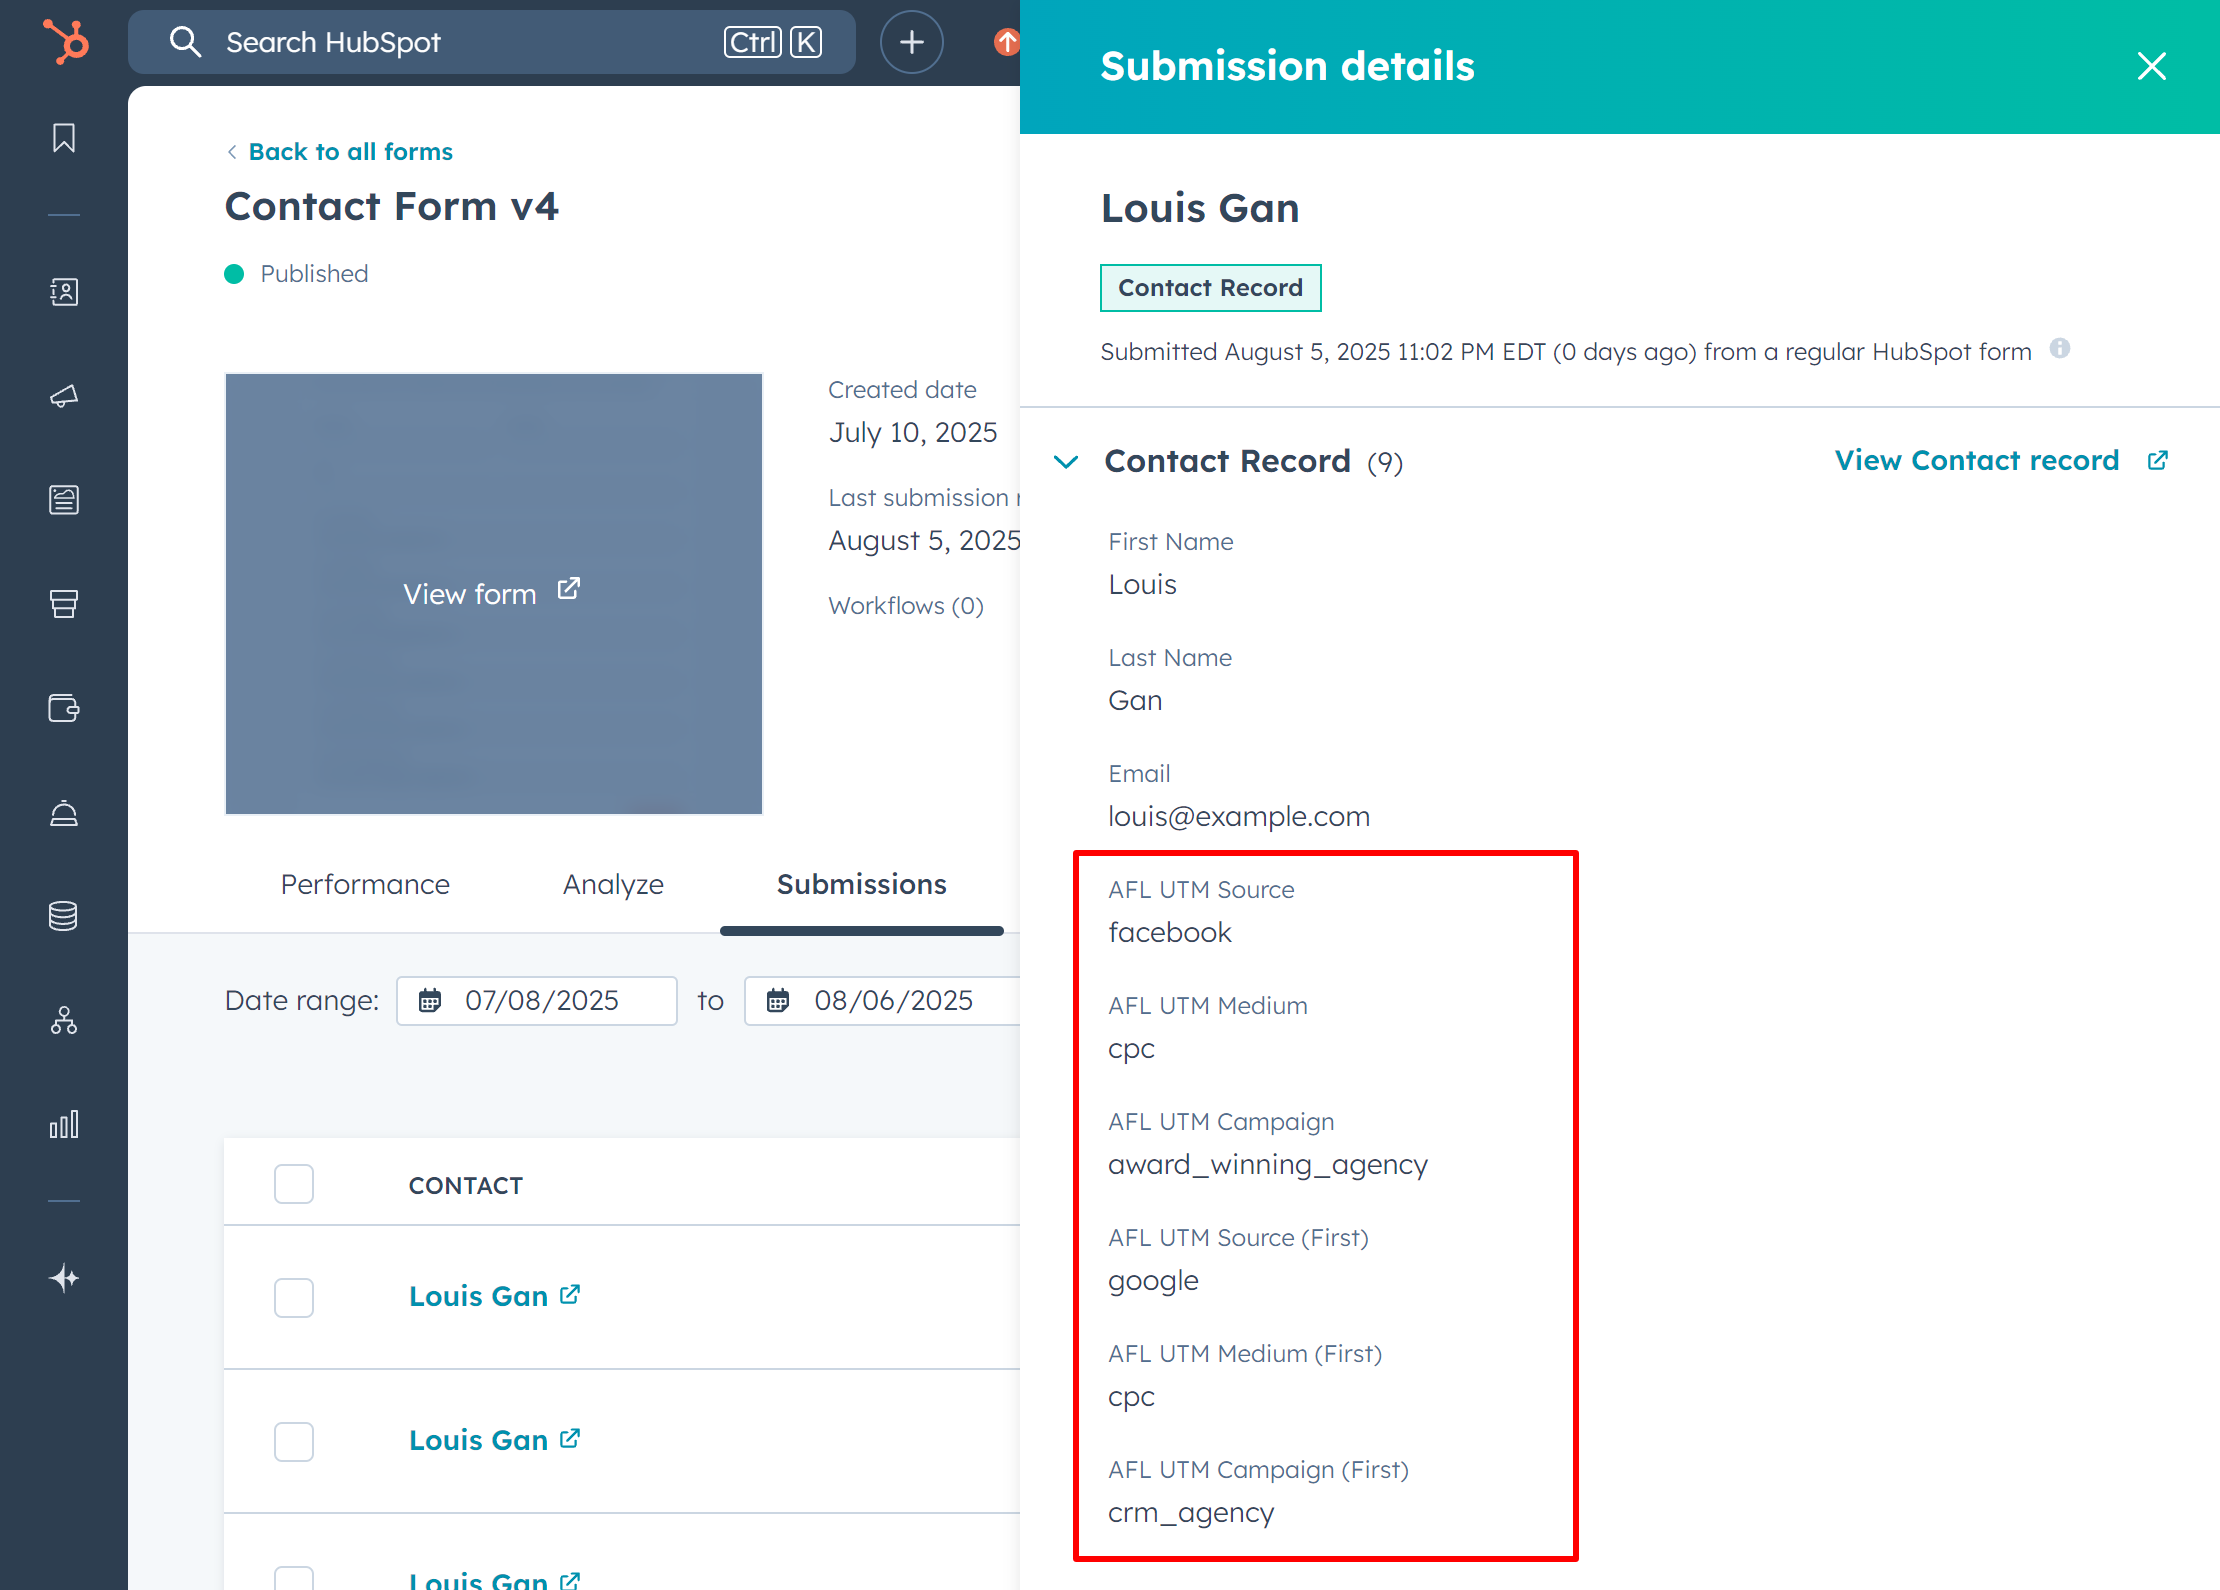
9. View your HubSpot Form Submission
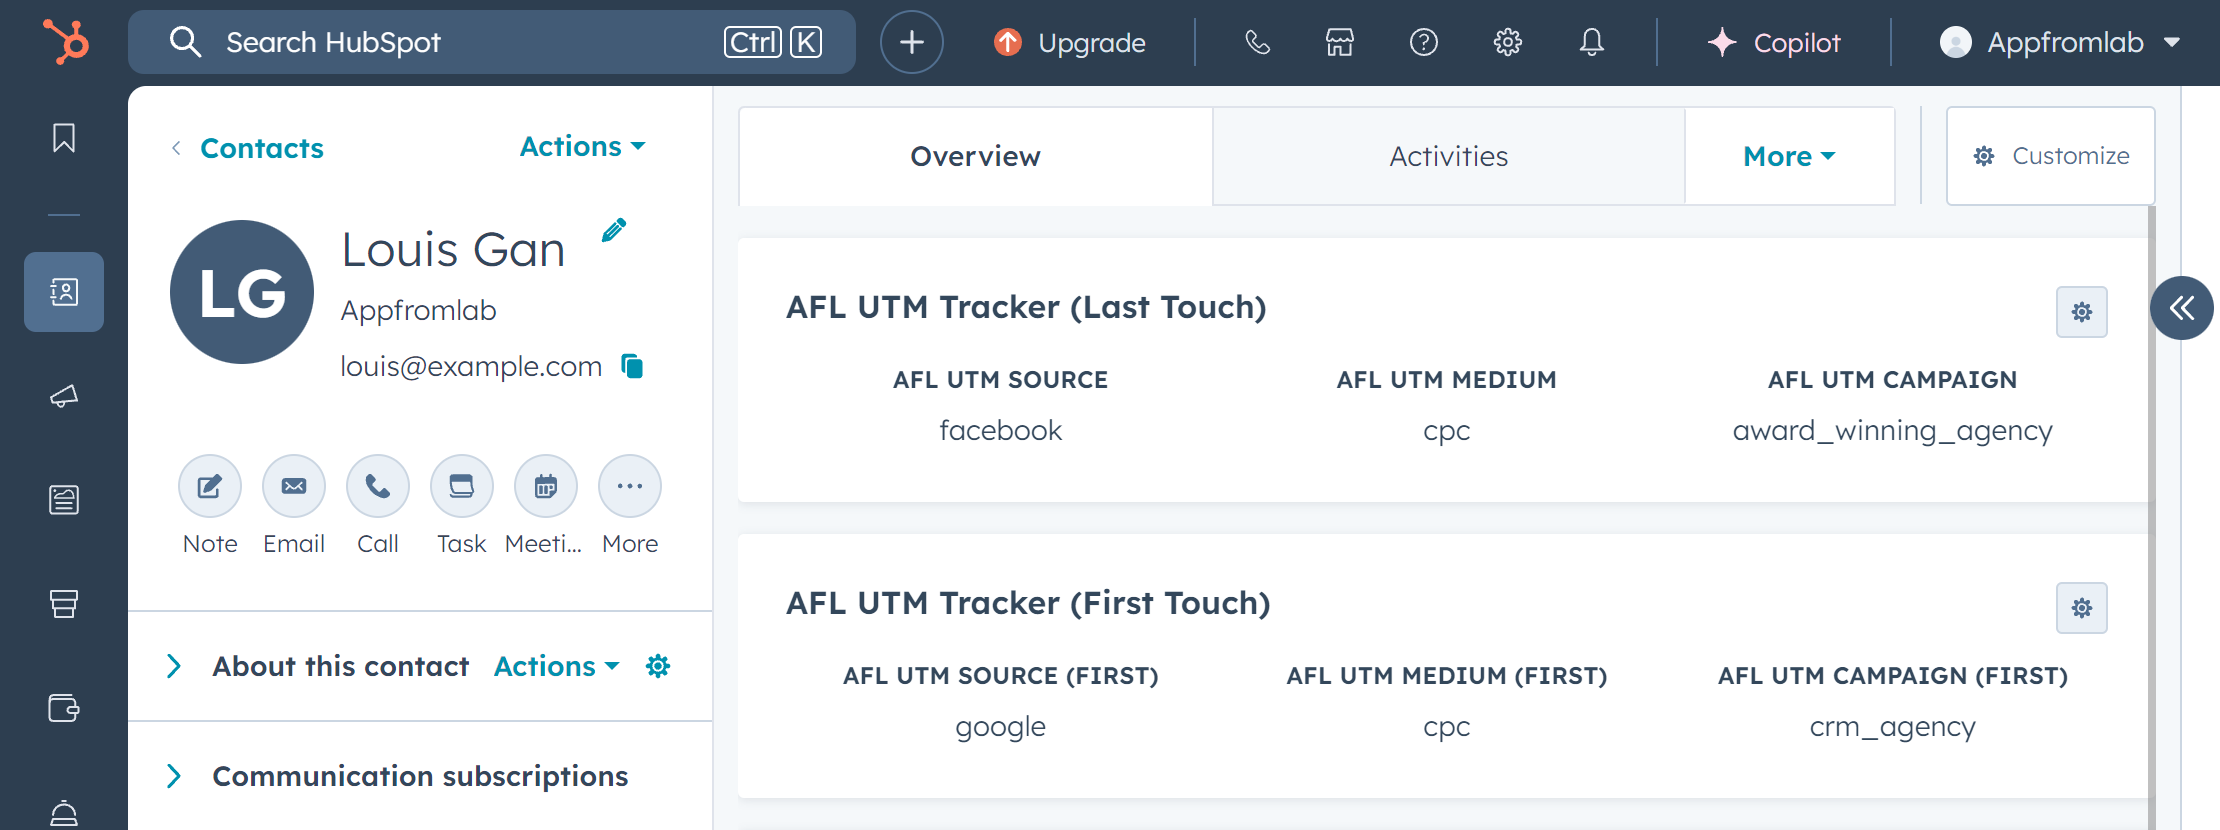
Here is how your Form Submission should look like:
Here is how your Contact view should look like:
- Contact card showing the Last Touch UTM parameters
- Contact card showing the First Touch UTM parameters.