Use our AFL UTM Tracker plugin to capture dynamic UTM parameters of your Elementor Form submissions.
- We will be using our Javascript Merge Tags to populate the UTM parameters into the Jetformbuilder hidden fields.
- You can populate First Touch and Last Touch UTM parameters.
- You can populate Click Identifiers (gclid, fbclid, msclkid and others).
- You can populate First Landing Page and First Website Referrer URLs.
Minimum Requirements
- AFL UTM Tracker v2.18.1
- Elementor Pro v3.28.0
- WordPress v5.0.0
NOTE: Hidden fields are not required for WordPress form builder plugins which we have seamless integration. You will also get a more enhance UTM attribution report.
Steps
Let’s summarize the steps to populate the UTM parameters into your Elementor Forms.
- Enable the “Javascript Merge Tag” feature under the AFL UTM Tracker plugin settings.
- Create Hidden Fields for UTM parameters.
- Test your Elementor Form submission.
- View UTM parameters in Elementor Form submission.
1. Enable the Javascript Merge Tag feature
- Login to your WordPress Admin dashboard.
- Go to AFL UTM Tracker > Settings page.
- Under Attribution section, enable the Javascript Merge Tag feature.
- Save settings.
- Clear all page cache from your caching plugin.
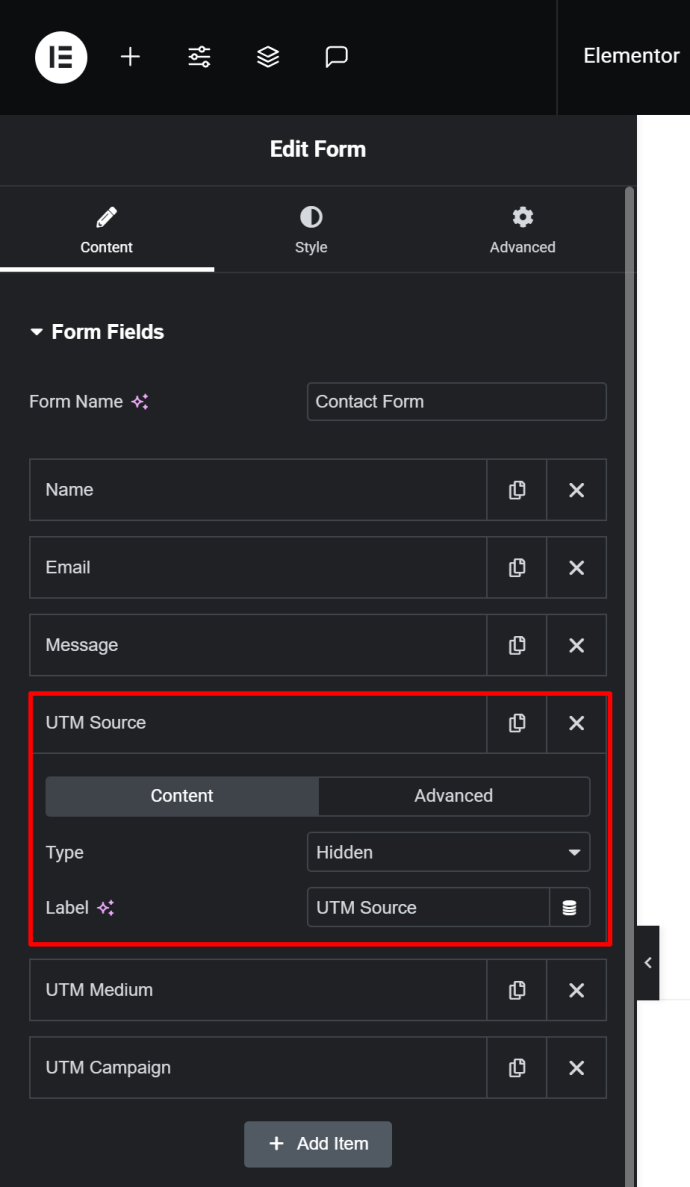
2. Create Hiddens Fields for UTM parameters
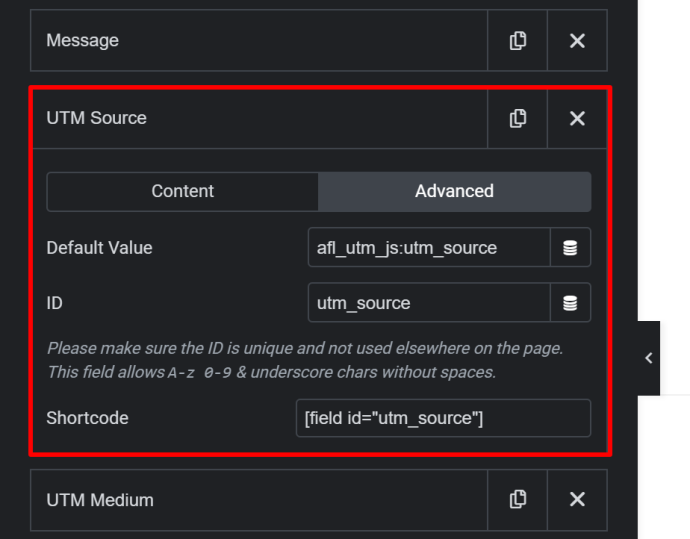
Here’s an example to capture the utm_source, utm_medium and utm_campaign into the hidden fields and inserting our Javascript Merge Tag into the Default Value field.
First Touch UTM parameters
- Add an item to the form.
- Type: Hidden
- Label: First UTM Source
- Advanced > Default Value: afl_utm_js:utm_source_1st
- Advanced > ID: utm_source_1st
- Add an item to the form.
- Type: Hidden
- Label: First UTM Medium
- Advanced > Default Value: afl_utm_js:utm_medium_1st
- Advanced > ID: utm_medium_1st
- Add an item to the form.
- Type: Hidden
- Label: First UTM Campaign
- Advanced > Default Value: afl_utm_js:utm_campaign_1st
- Advanced > ID: utm_campaign_1st
Last Touch UTM parameters
- Add an item to the form.
- Type: Hidden
- Label: Last UTM Source
- Advanced > Default Value: afl_utm_js:utm_source
- Advanced > ID: utm_source
- Add an item to the form.
- Type: Hidden
- Label: Last UTM Medium
- Advanced > Default Value: afl_utm_js:utm_medium
- Advanced > ID: utm_medium
- Add an item to the form.
- Type: Hidden
- Label: Last UTM Campaign
- Advanced > Default Value: afl_utm_js:utm_campaign
- Advanced > ID: utm_campaign
Click Publish or Save Draft.
Want to populate more attribution data?
Refer to our Javascript Merge Tag list to populate First Touch UTM parameters, Last Touch UTM parameters, click identifiers (gclid, fbclid, msclkid), first landing page, website referrer and other attribution data.
3. Test your Elementor Forms
- Generate your UTM tracking URL using Google Campaign URL Builder.
- Launch your browser in private-browsing mode to simulate a new visitor.
- Paste your UTM URL in the address bar and go.
- Navigate your site like a normal visitor.
- Then submit your form.
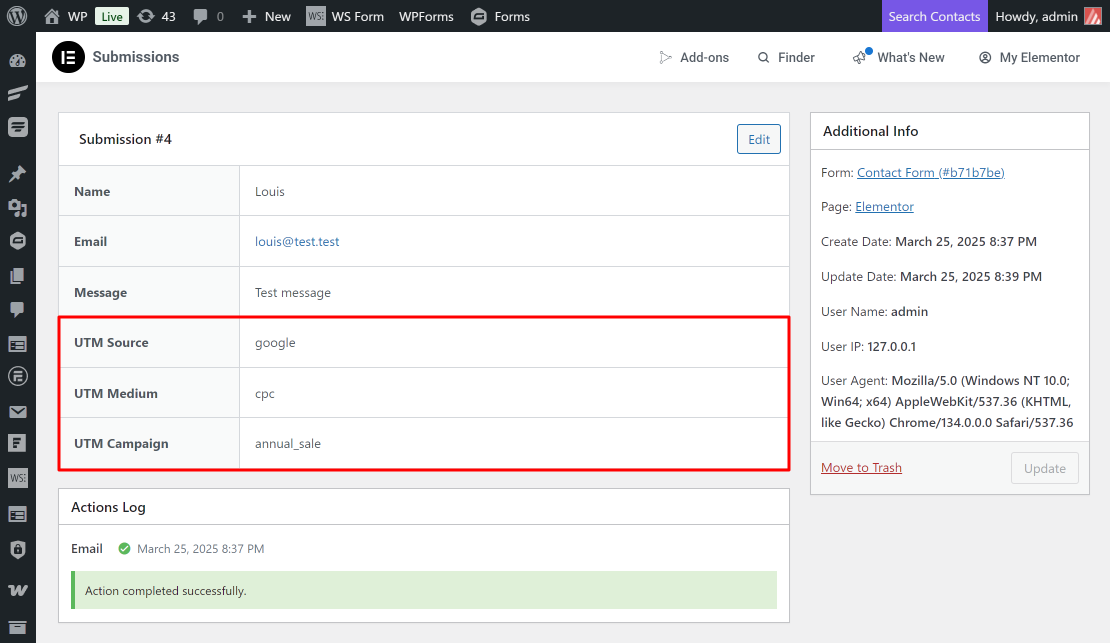
4. View your Elementor Forms submission
- Login to your WordPress admin dashboard.
- Go to Elementor > Submissions > Select your form.
- View the latest submission for the UTM parameters.