With our AFL UTM Tracker plugin, you can capture UTM parameters for your Gravity Forms submissions without using any hidden fields and it is enabled for all of your forms by default after plugin activation.
Imagine the hours of setup and testing time you will be saving as compared to other UTM tracking solution that uses hidden fields.
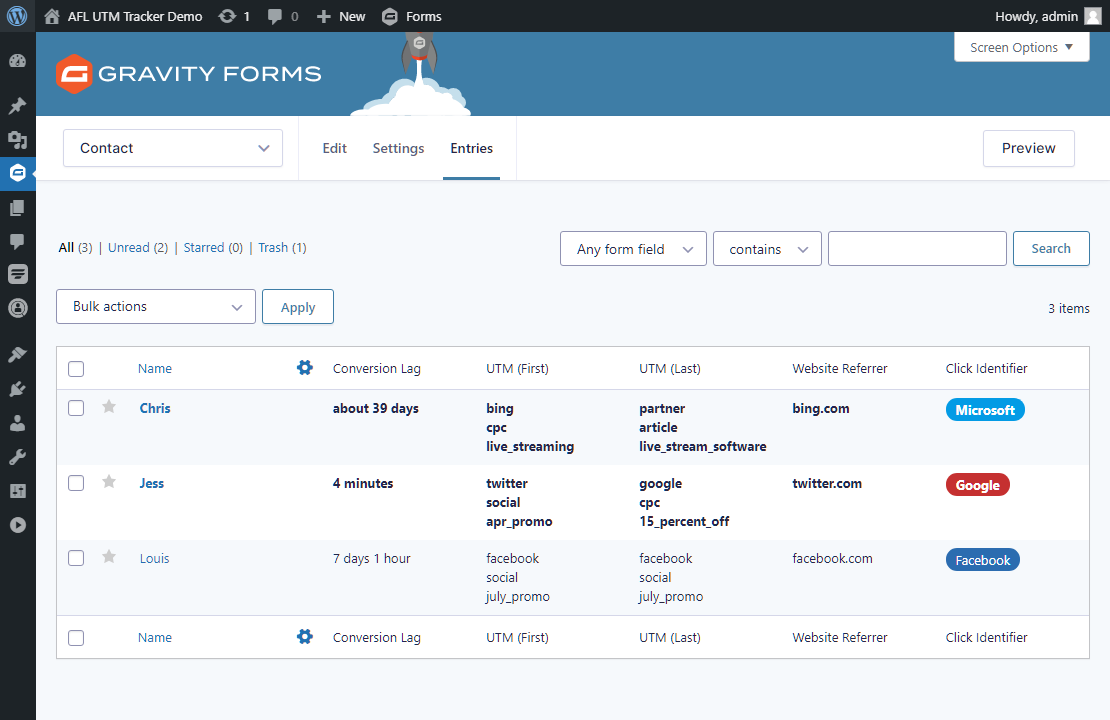
Our full conversion attribution report will tell you the first landing page, first website referrer, first and last touch UTM parameters and a few popular click identifiers (gclid, fbclid, msclkid).
Table of Contents
- Install our AFL UTM Tracker for Gravity Forms
- How does our WordPress plugin works?
- Testing your form with a UTM campaign URL
- Viewing the conversion attribution report
- Embed the conversion attribution report into the email notification
Install our AFL UTM Tracker for Gravity Forms
We built the AFL UTM Tracker plugin as a self-hosted UTM conversion tracking plugin for Gravity Forms.
Its main objective is to create a conversion attribution report based on the five UTM parameters (utm_source, utm_medium, utm_campaign, utm_term and utm_content) when your website visitor has summited the form on your website.
To download our AFL UTM Tracker plugin, you need to purchase our plugin from our online store. Then follow the quick setup
- Install our plugin into your WordPress website.
- Clear all your page cache so that the JavaScript tracking file will load on your website.
- That’s all. All of your forms have been automatically setup.
- Test your form.
No worries if you have hundreds of forms because everything is enabled by default. You don’t even have to add any hidden fields thus saving you hours of work.
How does our WordPress plugin works?
From the moment your website visitor arrives on your website, our plugin will store the UTM parameters in the browser cookie. Therefore the UTM parameter values are retained in the cookie even as your visitor browses from page to page or comes back on another day.
Once your visitor lands on a page with your Gravity Form and decides to submit the form, our plugin will read the UTM parameters from the browser cookie and saves it together with that Gravity Forms entry in your WordPress database.
You will then be able to view the captured UTM parameters in your WordPress admin.
Testing your form with a UTM tracking URL
Once you have setup our plugin, it is time to test out your form.
- Generate a UTM campaign URL to your form page using Google’s Campaign URL Builder.
- Visit your website using the UTM campaign URL in the private browser mode as to simulate a new visitor.
- Submit your Gravity Forms.
- Go back to your normal browser and login to your WordPress site.
- Go to the Gravity Forms > Forms page and select the form.
- Click to the Entries page and you’ll be able to view the summary of the conversion attribution report for each entry.
- Click into the entry which you have submitted to view the full conversion attribution report.
Viewing the conversion attribution report
So our conversion attribution report is divided to a few sections:
- Session – it tells you the conversion lag value, first landing page, first website referrer, Google Analytics Client ID.
- First Touch UTM – it tells you the first UTM campaign URL and the visited date time.
- Last Touch UTM – it tells you the last touch UTM campaign URL and the visited date time.
- Google Click Identifier (gclid) – it tells you the last touch URL which contained the gclid parameter and the visited date time.
- Facebook Click Identifier (fbclid) – it tells you the last touch URL which contained the fbclid parameter and the visited date time.
- Microsoft Click Identifier (msclkid) – it tells you the last touch URL which contained the msclkid parameter and the visited date time.
* The conversion lag value tells you how long it took for your visitor to submit the form from the time they first visited your website.

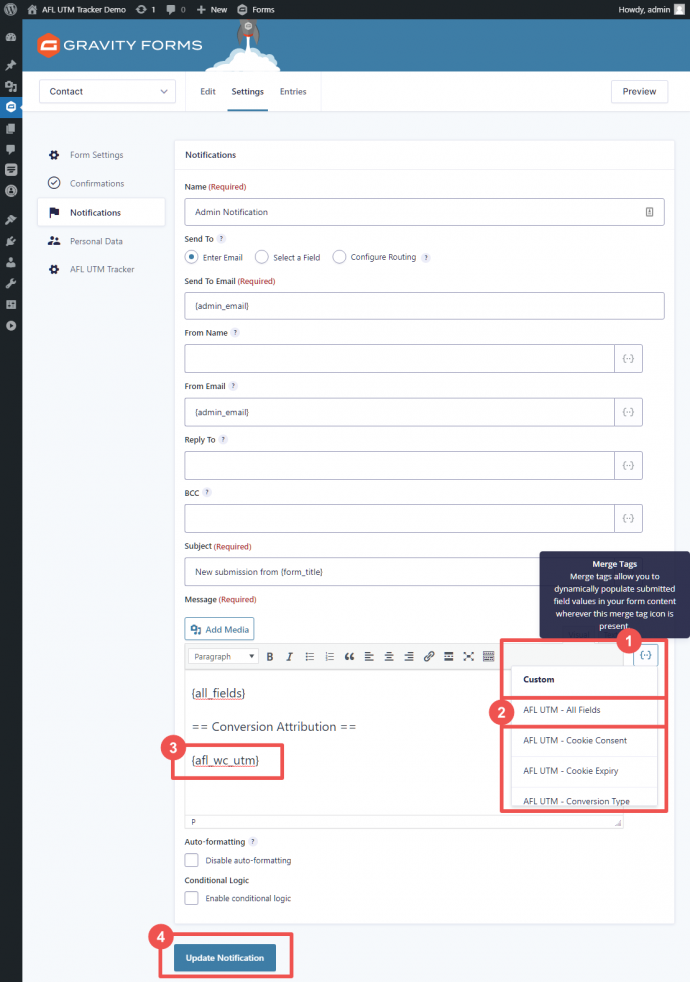
Embed the conversion attribution report into the email notification
The best part of our AFL UTM Tracker plugin is that you can easily embed the conversion attribution report into the Gravity Forms Admin Notification with just a single merge tag.
Ready to purchase our WordPress plugin?
View the full features of the AFL UTM Tracker plugin on our online store. It also works with WooCommerce and other form builders
We have hundreds of marketing agencies and Google certified partners already using our plugin for their client websites.
Give our plugin a try and start tracking your conversion attributions like a pro today.